Welcome to Moda Fabrics!
Winter Frost - Solstice
Winter Frost - Solstice
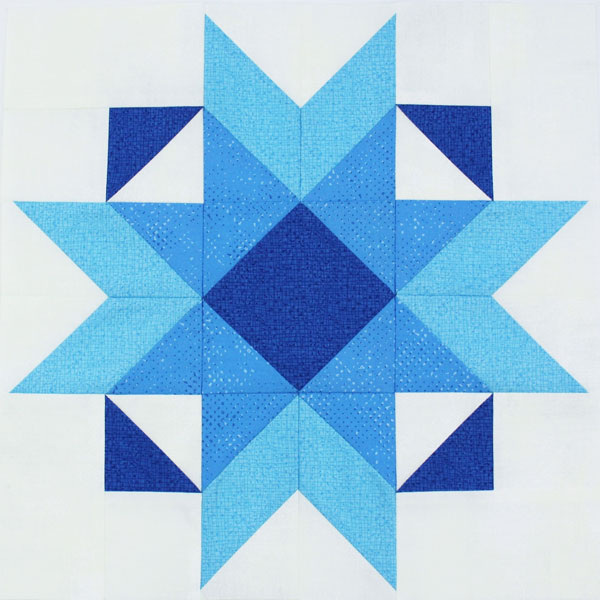
This 12” block is both striking and versatile—with careful color placement you can change the look of this block from a snowflake to a star! Scroll down to the bottom of the pattern for a look at my gradient star variation.
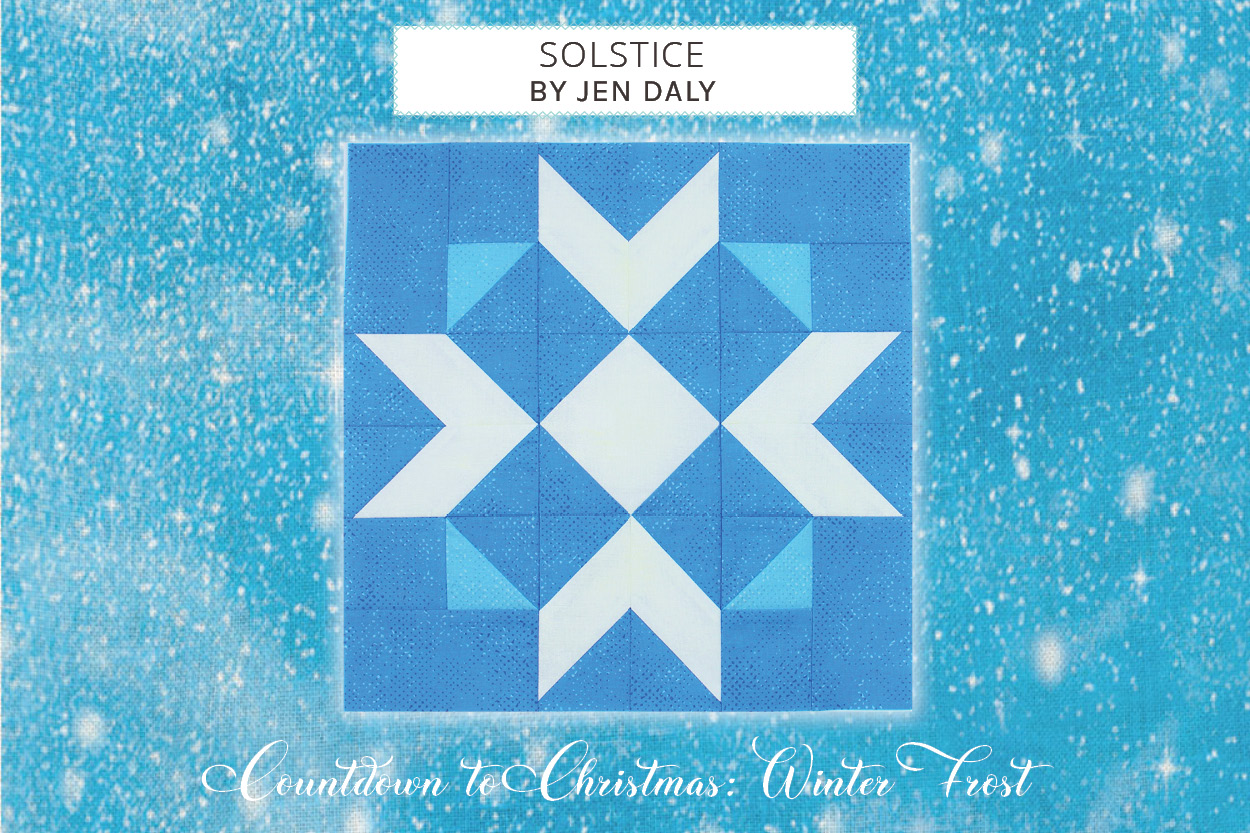
Snow Angel is one of the block options in the 2020 Countdown to Christmas - Winter Frost. For more info about this quilt-along, check out the Frequently Asked Questions and join our Moda Bake Shop Bakers group. Find all the blocks {here}.
Chef's Notes:
Press and starch all fabrics prior to cutting. Use a scant 1/4" seam.
YIELD
12" finished block
INGREDIENTS
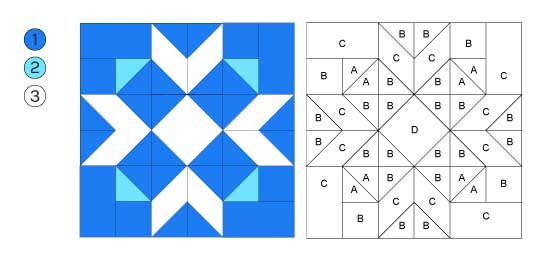
From fabric 1, cut:
{A} (2) 3” x 3” squares
{B} (24) 2½” x 2½” squares
{C} (4) 2½” x 4½” rectangles
From fabric 2, cut:
{A} (2) 3” x 3” squares
From fabric 3, cut:
{C} (8) 2½” x 4½” rectangles
{D} (1) 4½” x 4½” square
INSTRUCTIONS
STEP 1. MAKE UNIT A
On the wrong side of 2 turquoise print 3” squares, use a pencil to lightly draw a diagonal line from corner to corner. Layer a marked turquoise print square atop a blue print 3” square with right sides together. Stitch the pair together a scant ¼” from either side of the drawn line. Cut the pair apart on the drawn line to make 2 half-square triangles. Press seam allowances toward the blue and trim the HSTs to measure 2½” x 2½”, including seam allowances. Repeat to make 4 HSTs.

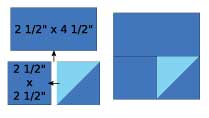
Sew a blue print 2½” x 2½” square to the left side of an HST from step 2 paying careful attention to the orientation of the HST. Sew a blue print 2½” x 4½” rectangle to the top of the blue 2½” square/HST unit as shown to make a Unit A. Repeat to make 4 Unit As.
STEP 2. MAKE UNIT B
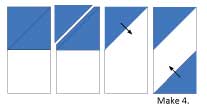
On the wrong side of 16 blue print 2½” squares, use a pencil to lightly draw a diagonal line from corner to corner. Layer a marked blue print square atop one short end of a white print 2½” x 4½” rectangle with right sides together, paying careful attention to the orientation of the stitching line. Stitch the pair together on the drawn line. Trim seam allowance to ¼” and press toward the white print.
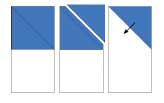
Use the same stitch-and-flip method to sew a blue print 2½” square to the opposite end of the white print 2½” x 4½” rectangle, paying careful attention to the orientation of the stitching line to make a left chevron unit. Repeat to make 4 left
chevron units.

In the same manner, use 8 remaining marked blue print 2½” squares and 4 white print 2½” x 4½” rectangles to make 4 right chevron units.
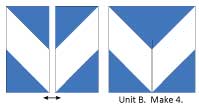
Sew together a left chevron unit and a right chevron unit as shown. Press seam allowances open to make a Unit B. Repeat to make 4 Unit Bs.
STEP 3. MAKE UNIT C
On the wrong side of 4 blue print 2½” squares, use a pencil to lightly draw a diagonal line from corner to corner. Layer a marked blue print square atop one corner of the white print 4½” x 4½” square with right sides together. Stitch the pair together on the drawn line. Trim seam allowance to ¼” and press toward the white print.
Use the same stitch-and-flip method to sew blue print 2½” squares to the remaining corners of the white print 4½” square to make a Unit C.

STEP 4. ASSEMBLE BLOCK
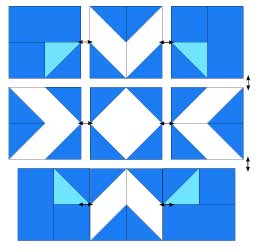
Lay out 4 Unit As, 4 Unit Bs, and Unit C in 3 horizontal rows as shown. Stitch together the pieces in each row, pressing the seam allowances open.
Stitch together the rows. Press the seam allowances open to finish the block.
Alternate Coloring
Jen Daly
If you missed any of the earlier posts -
- Winter Frost - Snow Angel
- Winter Frost - Nisse's Magic
- Winter Frost - Glistening Star
- Winter Frost - Mitten
- Winter Frost - Chalet
- Winter Frost - Snow Family
- Winter Frost - Icy Windows
- Winter Frost - Ohio Snowball
- Winter Frost - North Wind
- Winter Frost - Icicle Star
- Winter Frost - Frozen
- Winter Frost - Flurry
- Winter Frost - Ice Crystal
- Winter Frost - Snow Drop
- Winter Frost - Your Paws in Mine
- Winter Frost - Festival of Friends
- Winter Frost - Snow Bunting
- Winter Frost - Starflake
- Winter Frost - Jack Frost
- Winter Frost - Winter Palace
- Winter Frost - Countdown to Christmas 2020 - Fabrics/Yardage/Info
- Winter Frost - FAQs
- Winter Frost - Bear Creek Setting Option
- Winter Frost - Snowy Peaks Setting Option
- Winter Frost - Yardage PDF

Comments