Welcome to Moda Fabrics!
Binding Basics
Binding Basics
Published:
Apr 22 2022 - 06:45
It’s been a little while since we talked about bindings so let's do that today.
Many quilters have their same binding technique they’ve followed for years, and we are no different at Moda. However, it can be difficult for new sewists to cut through the Internet to find a binding tutorial that works for them. Hopefully this will be a help to quilters both new and experienced. This is Part 1 of Binding Basics, taking you through cutting and attaching the binding with your sewing machine. (Part 2 will cover finishing the binding.)
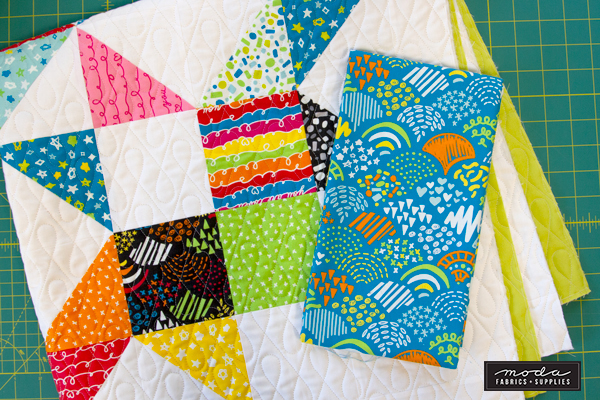
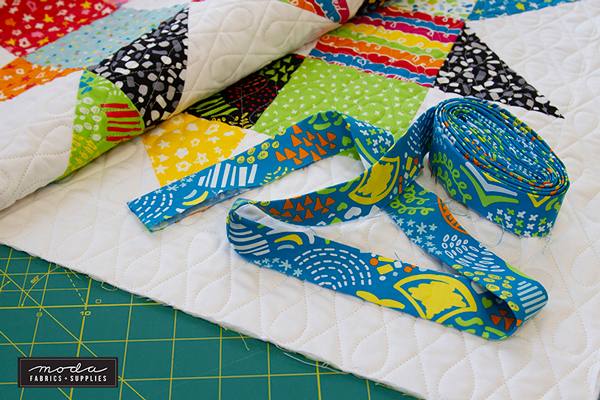
The project shown in this tutorial is the Moda Love Charm Quilt, made using a Charm Pack of Creativity Glows by Creativity Shell (47530PP), and a Charm Pack of Bella Solids in White Bleached (9900PP 98) plus 1/3 yard of extra Bella yardage to add 2.5” borders. The pattern is available here, and it comes in three sizes whether you want to use Layer Cake (10”) squares, Charm Pack (5”) squares, or Mini Charm (2.5”) squares - Moda Love Quilt.
Calculating Yardage Required
Step 1: Add up the length of all 4 sides of your quilt to find how long you want the binding to be.
Side 1 + Side 2 + Side 3 + Side 4 = TOTAL LENGTH
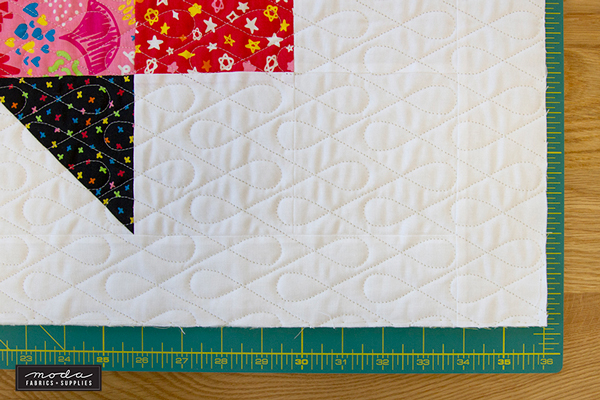
The project shown measures 36” wide and 36” tall, so:
36 + 36 + 36 + 36 = 144”
Step 2: To figure out how many strips you need to cut from your binding fabric, take the TOTAL LENGTH and divide by your useable width of fabric (aka, how long each strip will be). For quilting cotton yardage, that width of fabric is 40” give or take, depending on size of selvedges and slight manufacturing differences. However, you could just as easily use a Fat Quarter (WOF 22”) or other scrap size (simply measure longest side to find width). We are using quilting cotton yardage, so:
TOTAL LENGTH / 40 = # strips needed
144 / 40 = 3.6 = 4 strips needed*
*Note: Any decimal here means that you must round up the number of strips to cut. For example, if you need 6.7 strips, that means you need SEVEN strips, and will have extra leftover from the 7th after you’re finished. If my math tells me I need anything with a .9+ decimal (4.9 strips, 7.9 strips, etc) I like to add an EXTRA strip on top of rounding up (so, 4.9 strips becomes 6 strips). It’s not strictly necessary, but makes for a more comfortable finishing process in the last step to have extra fabric rather than exact length.
Step 3: Once you know how many fabric strips you need to make your total length of binding, multiply that number by the width of your binding to calculate the yardage needed to get that amount. If using 2.5” wide strips:
X strips x 2.5 = x” x WOF needed
4 strips x 2.5 = 10” x WOF needed (So I would buy 1/3 yard, which is 12” of fabric)
*Again, if your calculation is very close to a yardage amount, it’s safer to bump up to the next common cutting size to make sure you have enough yardage after squaring up. For example, if you need 17.5” x WOF of fabric, a half yard (18”) may be a little too narrow once you’ve squared up the fabric. Consider bumping up to 5/8 yard (22.5”) to give yourself more buffer.
Cutting The Binding
Once you know how many binding strips you need, lay out your fabric so that the two selvedge sides meet, with the fold facing toward you. You may need to re-press the fold so that the selvedges line up properly.
Square up your fabric so that the bottom folded edge is 90 degrees from the cut edge. Cut your strips. It’s not necessary to remove the selvedge edges at this stage.
Making The Binding
Lay out one binding strip Right Side Up on your table, with one of the selvedge ends in front of you. Layer a second binding strip perpendicular to that one, with the selvedge ends overlapping as shown. Using a pencil, chalk, or fabric pen, draw a diagonal line across this square to mark your stitch line. Why diagonal rather than sewing straight edge to edge? Not only does a bias seam make for a stronger binding, but it also helps reduce bulk once the binding is folded over the edge.
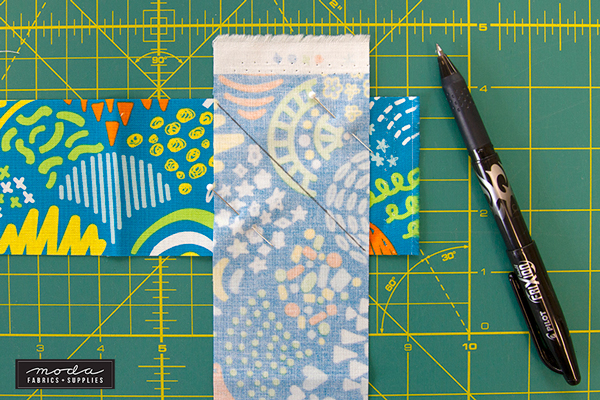
Pin to secure, and stitch along diagonal line. Trim to a ¼” seam allowance, cutting off the selvedges in the process. (TIP: The selvedges make a handy way to double check you’re cutting on the correct side of your stitching, rather than accidentally cutting apart the strips you just sewed by cutting on the incorrect side of the stitch line.)
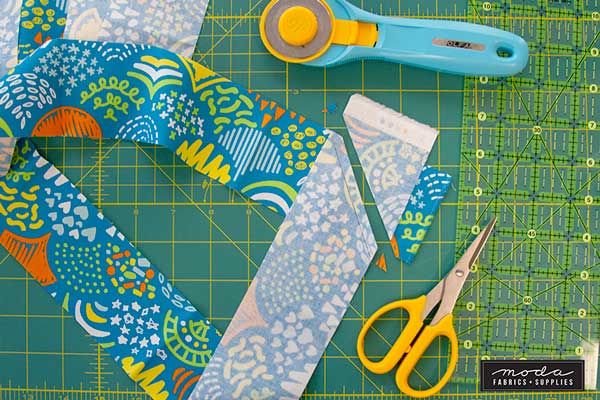
Repeat to make one long strip, and then press your seams open. Press the binding strip in half longways, Wrong Sides Together, to get it ready for attaching to the quilt. Once you’ve pressed the full length, it’ll help keep you organized to roll it up a bit (so you’re not at risk of stepping on it, or rolling your chair over it). It usually ends up an un-rolled ball by the time you finish attaching it, but it’s always better to set yourself up for being tidy!
Attaching The Binding
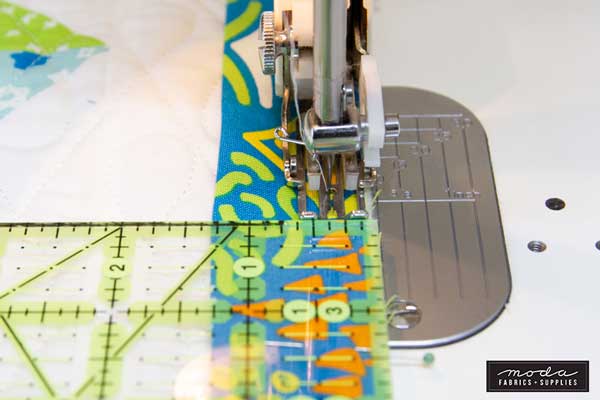
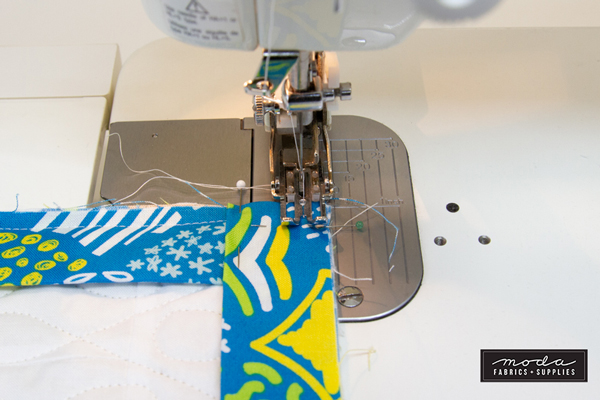
It is recommended that you use your machine’s walking foot to attach binding, to prevent any puckering as the layers of fabric go through the needle. This is less important on a smaller project like this where there’s less distance down each side of the project where the fabric can move around, but still always a good tool to have.
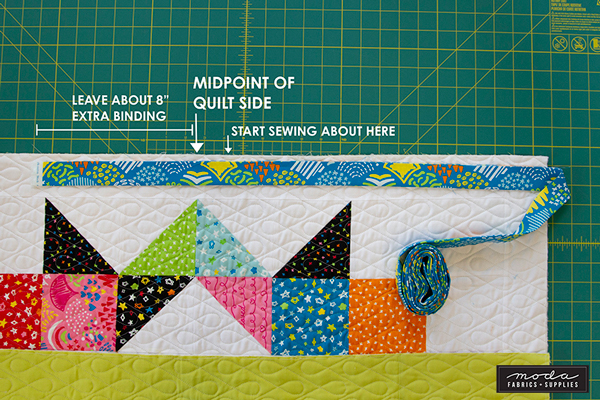
Start around the middle of one side of your project. Align the raw edge of the binding with the raw edge of the quilt, skipping 6” to 10” of binding fabric (so you have room to finish the binding at the end).
For a 2.5” binding, use a scant 3/8” seam allowance to sew down the binding. You want to make sure there’s enough binding left to turn over to the back of the quilt and cover the stitch line from where it was sewn on. If you’re not sure, you can always check how the binding will turn around the back after you’ve sewn down a few inches.
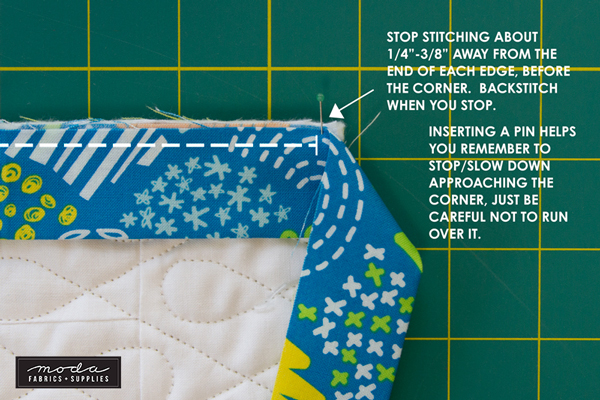
Making sure to backstitch at the beginning and end of your sewing, stitch from your starting point down toward the first corner. Stop approximately ¼” away from the bottom edge; You may find it helpful to insert a pin ¼” from the bottom so that you can see how far to go—just make sure not to run over the pin! Backstitch, and remove the quilt from the machine.
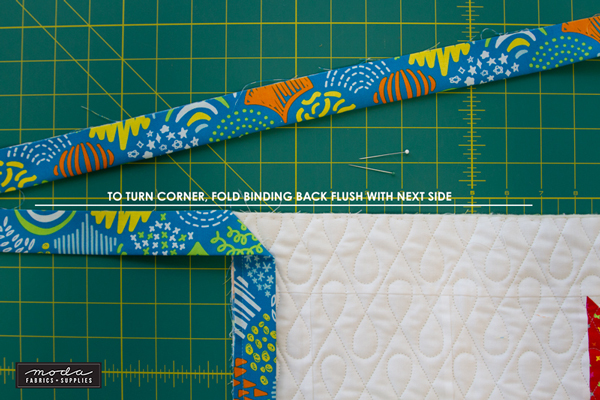
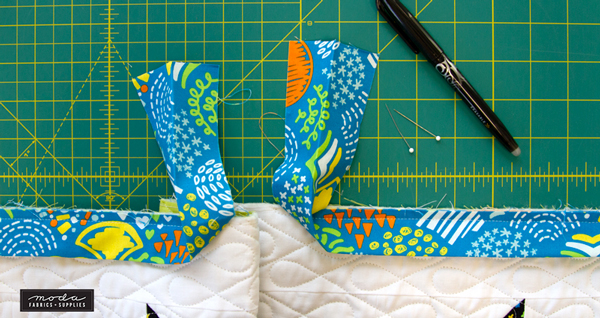
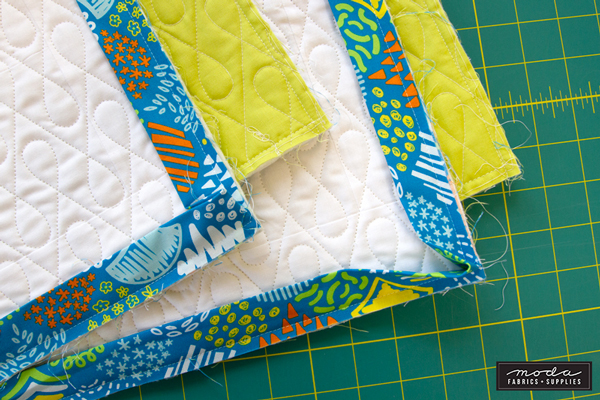
To create a nice corner, fold back the unsewn binding strip so that the raw edge extends the next raw edge side of the quilt. Then, fold the binding back down the quilt edge so that the fold lines up straight with the raw edge you just stitched.
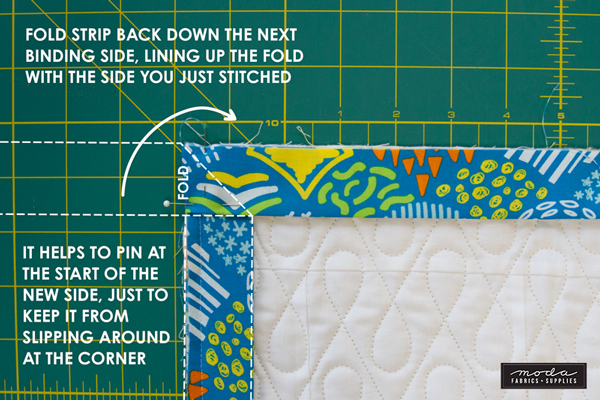
Restart stitching down the new side, starting from the edge you just sewed down. Repeat this pivot at all 4 corners.
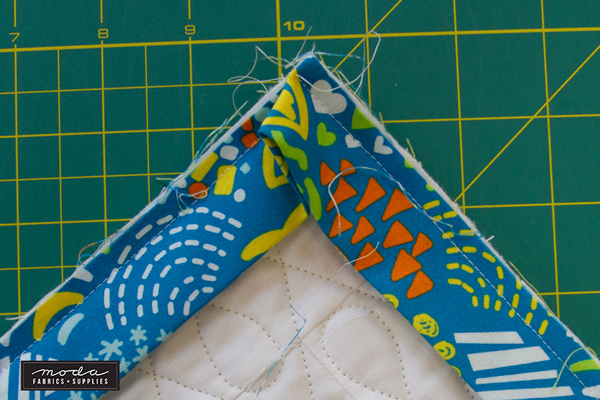
Here you can see what a corner looks like after you’ve folded and stitched down the next side. By stopping and starting, you’re creating a little space in the stitching for a fold in the fabric, which turns into a perfect mitered corner after you’re finished.
Joining The Binding
*There are many methods for joining ends of binding, but all have the same goal: to get the binding laying as smoothly as possible so there isn’t too much or too little to cover the quilt you have left.
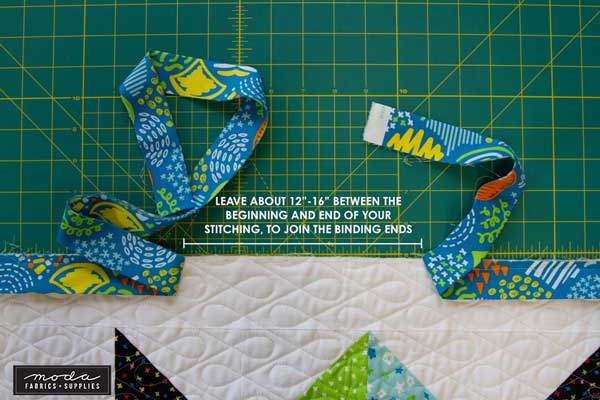
As you’re stitching down the last side of the binding (on the same side where you started), stop and backstitch about 12” away from where you started, and remove the quilt from the machine.
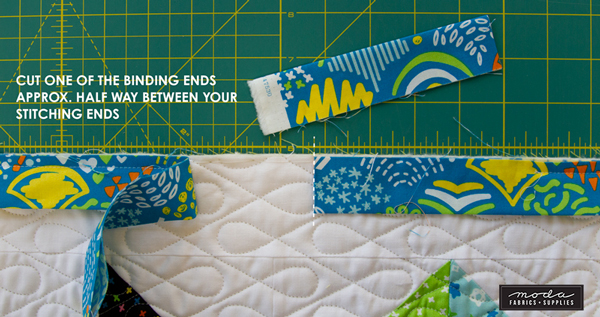
Lay the quilt on a flat surface, making sure you have enough room to flatten the binding out (so you don’t end up with too much or too little binding for your quilt). Trim one end approximately ½” past the mid-point between the two stitching ends, and then lay the cut piece of binding perpendicular over the cut end, so it lines up with where you cut.
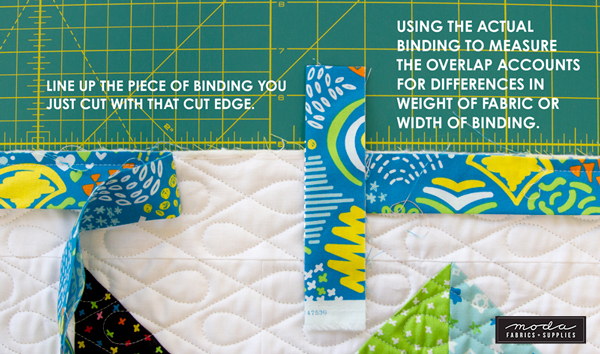
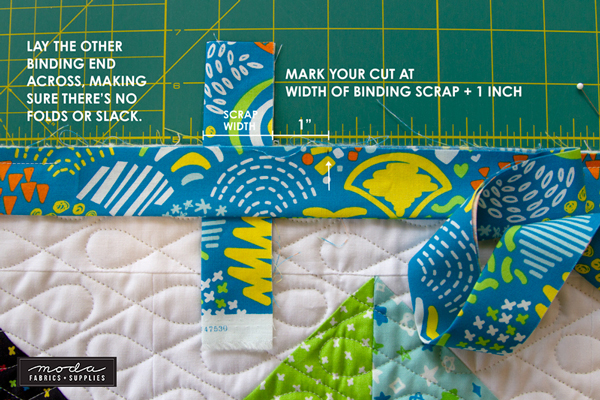
Lay the other binding end over the top. Leaving the distance of the binding scrap PLUS ONE INCH, mark and then cut the other binding end. Why do I use a scrap of my binding as part of this final measurement? Not only does it keep you from having to do more math depending on what size binding you’ve used (you’ll always do binding scrap + 1 inch), it also accounts for any variation in fabric weight or slight variation in how scant your cutting is vs. what size you planned for. Like most quilters, this is just the way I learned it!
Once you have cut both binding ends, you’ll want to scrunch or fold under your quilt to get the fabric ends as close together as you can, so you have enough fabric to get it lined up properly and through the sewing machine.
Flatten the left strip out, and place the right strip over top of it, Right Sides Together, so that they make a right angle and line up at the top and right edge. Pin in place, and draw your stitch line from corner to corner. Just like you did when joining the binding strips all together, but without the extra overlap.

Sew along your marked line. Before you trim the seam allowance, remove the pins, and test out the seam by pulling the quilt and binding flat and taut. It should lay smoothly across the quilt edge, even with the extra fabric still there. If it feels too short, or too long, you can always unpick your stitches on the diagonal seam and adjust.

When it’s spot on, trim the seam allowance, and finish stitching the binding to the quilt, making sure to backstitch at the start and end of your stitching.
That covers Part 1 of Binding Basics!
Keep an eye out for Part 2 where we cover finishing the binding on the reverse side.
-----------------------------------------------
For a downloadable PDF of this blog post - Binding Basics Part 1
Posted in:
Comments